> ## Documentation Index
> Fetch the complete documentation index at: https://docs.intention.xyz/llms.txt
> Use this file to discover all available pages before exploring further.
# The trading screen
> A tour of the exchange interface: what each panel shows, and which numbers to read before placing an order.
Everything you need to trade is on one screen. This page walks through it panel by panel.
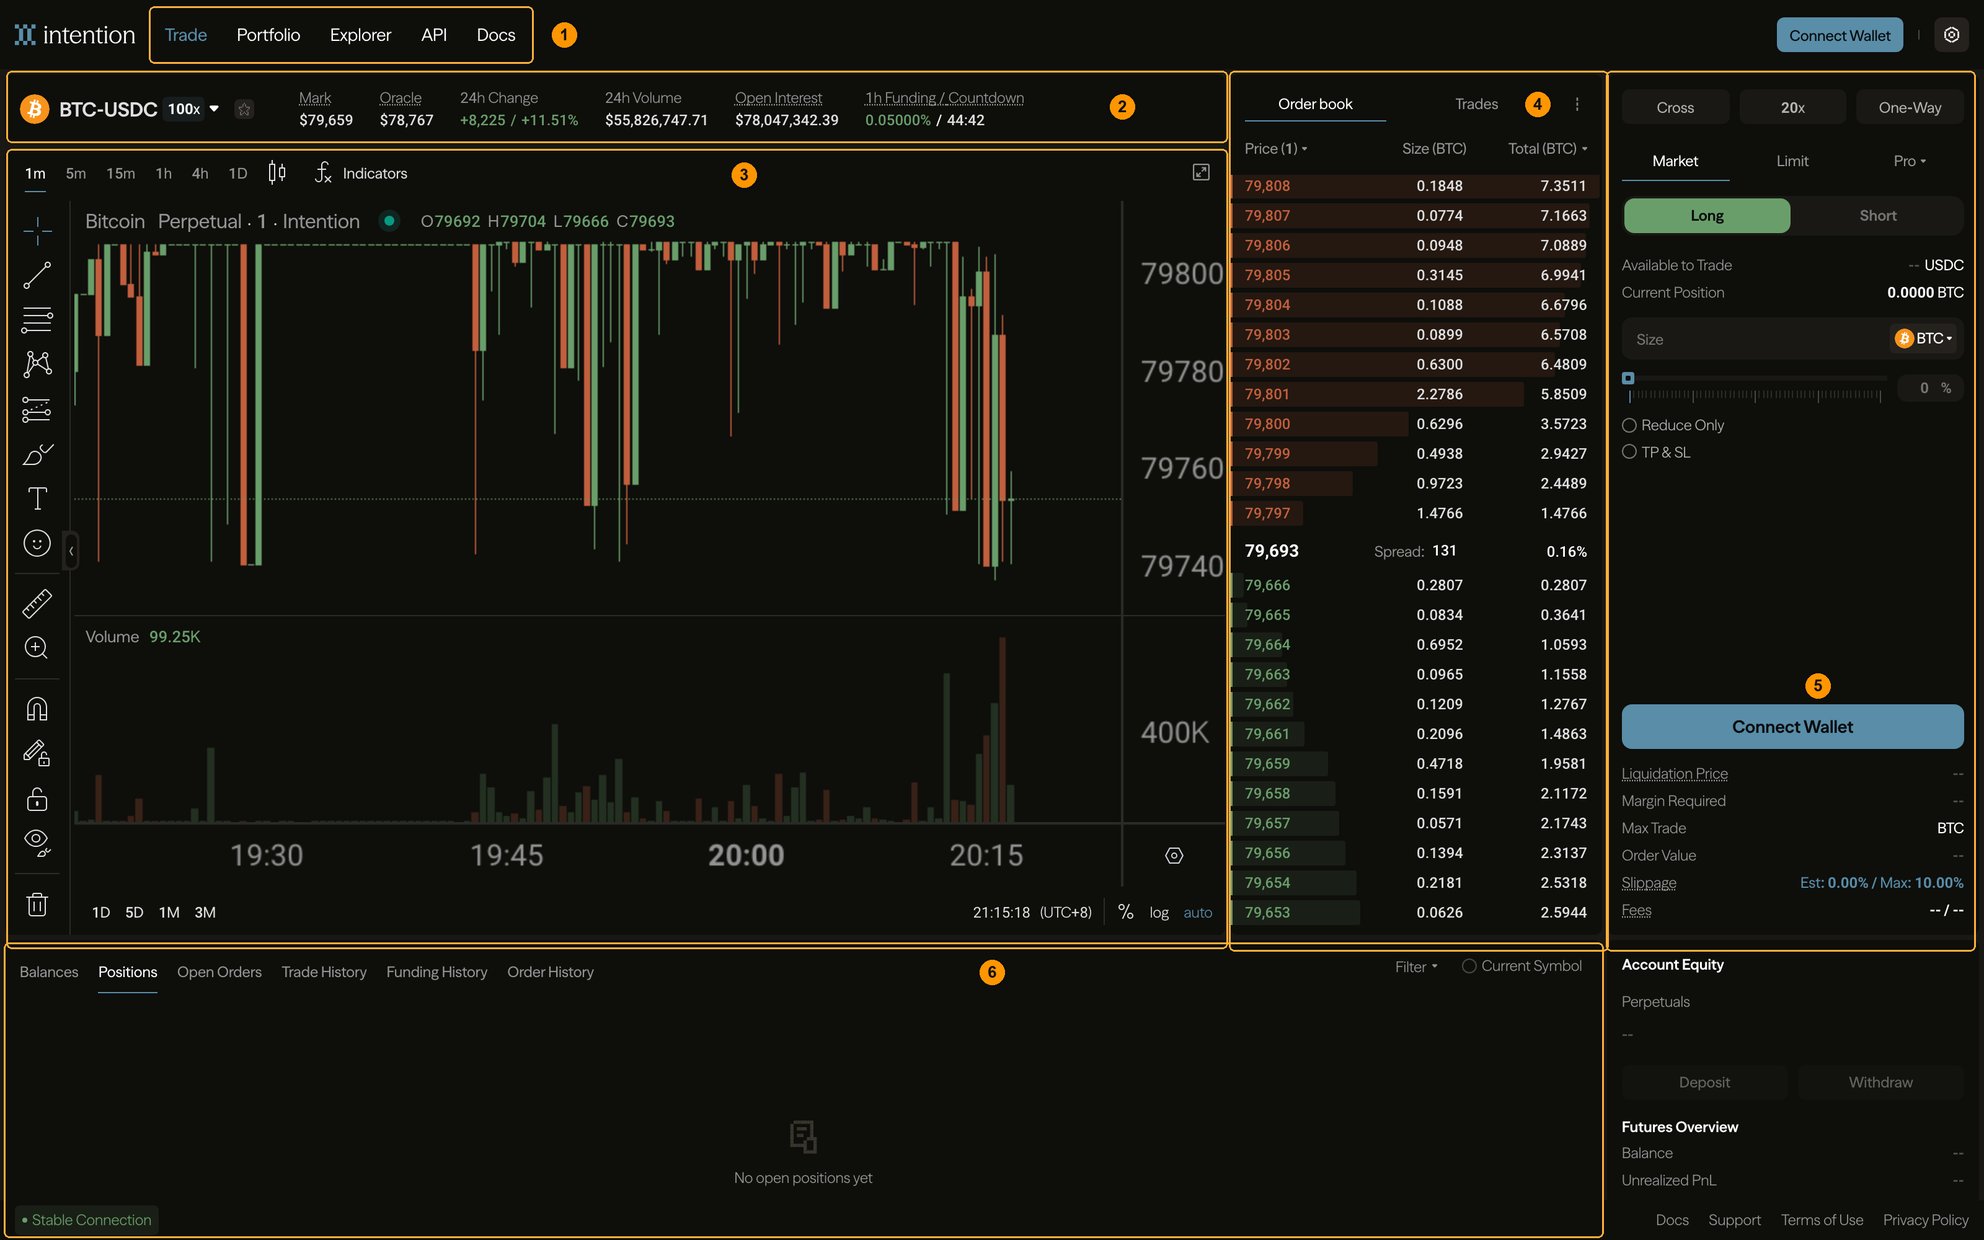 | | Panel | What it is for |
| ----- | ------------------------------------------------ | ---------------------------------------------------------------------------------- |
| **1** | Navigation | Trade, Portfolio, Explorer, API, Docs — and the wallet connect button on the right |
| **2** | [Market header](#2-market-header) | Which contract you are trading, and its current state |
| **3** | Chart | Price history, timeframes, and drawing tools |
| **4** | [Order book](/help/order-book) | Live resting bids and asks |
| **5** | [Order ticket](/help/order-ticket) | Where you actually place a trade |
| **6** | [Positions and history](/help/positions-history) | What you hold and what you have done |
## 2. Market header
The row that tells you what you are trading and what it is doing.
| | Panel | What it is for |
| ----- | ------------------------------------------------ | ---------------------------------------------------------------------------------- |
| **1** | Navigation | Trade, Portfolio, Explorer, API, Docs — and the wallet connect button on the right |
| **2** | [Market header](#2-market-header) | Which contract you are trading, and its current state |
| **3** | Chart | Price history, timeframes, and drawing tools |
| **4** | [Order book](/help/order-book) | Live resting bids and asks |
| **5** | [Order ticket](/help/order-ticket) | Where you actually place a trade |
| **6** | [Positions and history](/help/positions-history) | What you hold and what you have done |
## 2. Market header
The row that tells you what you are trading and what it is doing.
 **1 — Symbol and max leverage.** The contract, and the highest leverage it allows. Click it to switch markets; the badge (`100x` here) is a property of *this* contract, not of your account.
**2 — Mark price.** The price your position is valued at. This drives your unrealized P\&L and your liquidation — **not** the last traded price. It is deliberately smoothed so a single print cannot move it. See [Mark price](/trading/mark-price).
**3 — Oracle price.** The external reference the network agreed on through consensus. Mark price is anchored to it. See [Index price](/trading/index-price).
**4 — Open interest.** Total size held open in this contract. It tells you how much position exists, which is a different question from how much has traded.
**5 — Funding and countdown.** The current rate and the time until it settles. **Positive means longs pay shorts**; negative is the reverse. If you hold through the countdown, this is charged or paid. See [Funding](/trading/funding).
Mark and Oracle sitting slightly apart is normal — mark tracks this venue's book, oracle tracks the outside world. A large, persistent gap is worth understanding before you size a position, because funding is what closes it.
## 3. Chart
Standard candlestick charting with timeframes from 1m to 1D, indicators, and drawing tools down the left edge. The **Chart / Depth** toggle at the top right swaps the price chart for a depth view of the book.
The chart is a reading aid. Nothing on it affects your order — the numbers that matter for execution are in the header and the ticket.
## 6. Positions and history
**1 — Symbol and max leverage.** The contract, and the highest leverage it allows. Click it to switch markets; the badge (`100x` here) is a property of *this* contract, not of your account.
**2 — Mark price.** The price your position is valued at. This drives your unrealized P\&L and your liquidation — **not** the last traded price. It is deliberately smoothed so a single print cannot move it. See [Mark price](/trading/mark-price).
**3 — Oracle price.** The external reference the network agreed on through consensus. Mark price is anchored to it. See [Index price](/trading/index-price).
**4 — Open interest.** Total size held open in this contract. It tells you how much position exists, which is a different question from how much has traded.
**5 — Funding and countdown.** The current rate and the time until it settles. **Positive means longs pay shorts**; negative is the reverse. If you hold through the countdown, this is charged or paid. See [Funding](/trading/funding).
Mark and Oracle sitting slightly apart is normal — mark tracks this venue's book, oracle tracks the outside world. A large, persistent gap is worth understanding before you size a position, because funding is what closes it.
## 3. Chart
Standard candlestick charting with timeframes from 1m to 1D, indicators, and drawing tools down the left edge. The **Chart / Depth** toggle at the top right swaps the price chart for a depth view of the book.
The chart is a reading aid. Nothing on it affects your order — the numbers that matter for execution are in the header and the ticket.
## 6. Positions and history
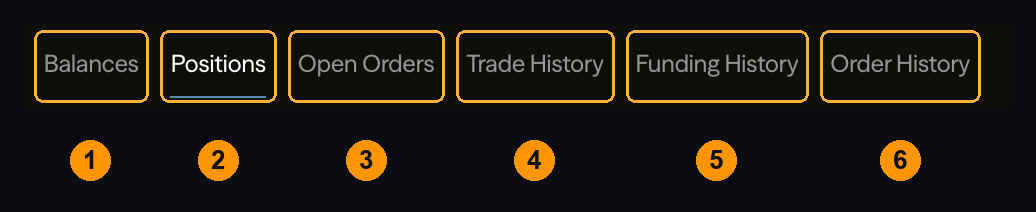 | | Tab | Shows |
| ----- | --------------- | ------------------------------------------------------------------- |
| **1** | Balances | Collateral, by asset |
| **2** | Positions | What you currently hold, with unrealized P\&L and liquidation price |
| **3** | Open Orders | Resting orders that have not filled. Cancel them here |
| **4** | Trade History | Individual fills, with the fee charged on each |
| **5** | Funding History | Every funding payment made or received |
| **6** | Order History | Every order, including cancelled and rejected ones |
The distinction between **Trade History** and **Order History** catches people out. An order that filled in five pieces is one row in Order History and five rows in Trade History — because [fees are charged per fill](/programs/fees), not per order.
**Funding History** is its own tab for a reason: funding is not a fee and does not appear in Trade History. If your balance moved and you cannot find a trade explaining it, look here first.
## Account and funding
| | Tab | Shows |
| ----- | --------------- | ------------------------------------------------------------------- |
| **1** | Balances | Collateral, by asset |
| **2** | Positions | What you currently hold, with unrealized P\&L and liquidation price |
| **3** | Open Orders | Resting orders that have not filled. Cancel them here |
| **4** | Trade History | Individual fills, with the fee charged on each |
| **5** | Funding History | Every funding payment made or received |
| **6** | Order History | Every order, including cancelled and rejected ones |
The distinction between **Trade History** and **Order History** catches people out. An order that filled in five pieces is one row in Order History and five rows in Trade History — because [fees are charged per fill](/programs/fees), not per order.
**Funding History** is its own tab for a reason: funding is not a fee and does not appear in Trade History. If your balance moved and you cannot find a trade explaining it, look here first.
## Account and funding
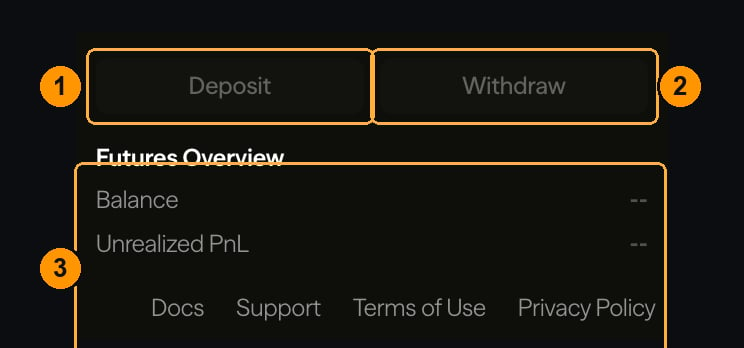 **1 — Deposit.** Move collateral in. See [Deposit](/help/deposit).
**2 — Withdraw.** Move it out. See [Withdraw](/help/withdraw).
**3 — Futures overview.** Balance, unrealized P\&L, cross margin ratio, and maintenance margin. The last two are your distance from [liquidation](/trading/liquidations): maintenance margin is the floor, and the ratio is where you currently sit relative to it.
## The connection indicator
Bottom left shows connection state. **Stable Connection** means the screen is receiving live updates.
Worth glancing at before you act on a price. If the connection drops, the numbers on screen are the last ones received rather than the current ones — and the book you are looking at may no longer be the book you would trade into.
## Where to go next
Every control, and what it does to your order.
Bids, asks, spread, and depth.
A worked example, start to finish.
Finding a fill, a fee, or a funding payment.
**1 — Deposit.** Move collateral in. See [Deposit](/help/deposit).
**2 — Withdraw.** Move it out. See [Withdraw](/help/withdraw).
**3 — Futures overview.** Balance, unrealized P\&L, cross margin ratio, and maintenance margin. The last two are your distance from [liquidation](/trading/liquidations): maintenance margin is the floor, and the ratio is where you currently sit relative to it.
## The connection indicator
Bottom left shows connection state. **Stable Connection** means the screen is receiving live updates.
Worth glancing at before you act on a price. If the connection drops, the numbers on screen are the last ones received rather than the current ones — and the book you are looking at may no longer be the book you would trade into.
## Where to go next
Every control, and what it does to your order.
Bids, asks, spread, and depth.
A worked example, start to finish.
Finding a fill, a fee, or a funding payment.